In my Versatile PC Remote project I described how we can make a very flexible remote for PC. I built driver software based on JAVA to perform complex tasks. Here I am going to make an USB PC Remote which works as ‘Plug and Play’ device. This remote does not need any driver and it works with all computers including Raspberry Pi. It can be used to control PC during presentation, watching movie etc.
Here we will make the IR receiver only. For remote controller we can use widely available general purpose remote (e.g. TV, DVD remote).
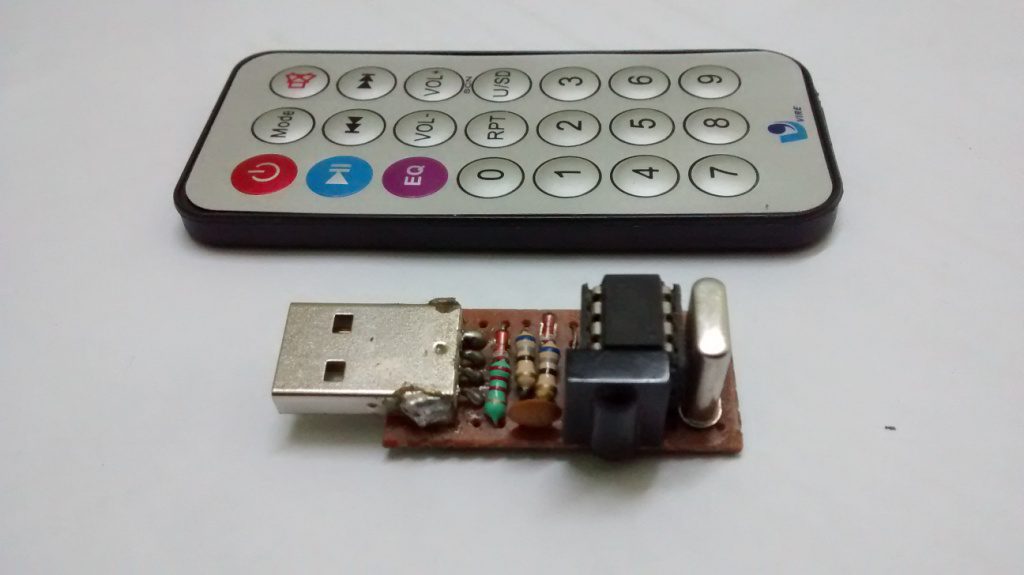
My Prototype Device and Remote:
Required Components:
- Atmel ATtiny85-20PU Microcontroller
- 8 pin DIP socket
- 16MHz Crystal
- TSOP 1738
- 100nF ceramic capacitor
- 1 x 2K2 resistor
- 2 x 68R resistors
- 2 x 3.6V Zener diodes (0.5W or less)
- Male USB A connector
- Veroboard
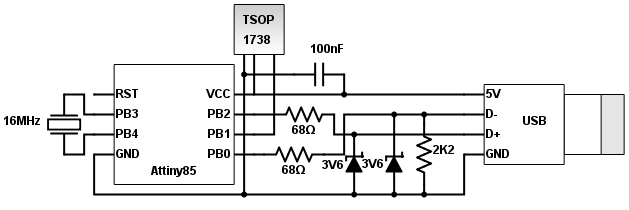
IR Receiver Circuit Diagram:
Required Software:
- vusb-for-arduino library
- Ken Shirriff’s IR Remote library
- Attiny85 Bootloader for 16MHz Crystal
- IR Key Code Finder
- Attiny85 Based Universal PC-Remote
IR Protocols: IR remote communicate with its application using Infra-Red ray which is invisible to human eyes. Infra-Red is another electromagnetic wave like light but its wave-length is larger than light. There are many infra-red sources are present in our environment like sun, electrical bulb or any hearting objects. To avoid interference with these IR rays proper modulation and encoding is necessary. Different remote manufacturers use different encoding pattern known as IR protocols. While decoding these protocols we need different algorithm. In this project I will deal with the most commonly used IR protocols e.g. RC5, RC6 and NEC. To know more about this protocols please follow my IR protocol tutorials.
Plug and Play Device: Every device that can be attached with computer needs associate software installed known as driver. The OS contains some in built driver for very common device like USB pen-drive. User can use these devices without any manual software installation and these are known as Plug and Play Device. In this project I am going to leverage Generic USB Keyboard driver which is present in almost all computer OS. This means the receiver device I make, will act like keyboard. I have tested with Windows, Linux, Mac, Raspberry Pi, Android Phone and it works fine.
Basic Concept: Attiny85 Microcontroller is at the heart of the whole project. When user presses any button on remote, the emitted IR message sensed and demodulated to raw message by TSOP IR sensor. The raw message is encoded by remote controller with its IR protocol. My Attiny85 code first decodes this protocol and extracts IR key code for further process. Decoding different protocol needs different algorithm and proper Attiny85 code (RC6, RC5 or NEC) must be chosen.
The Attiny85 microcontroller does not have hardware to communicate USB directly. But the USB functionality also can be achieved by software. VUSB is awesome software-only USB implementation library, which is designed for AVR microcontroller and Arduino. With very little tweak (will discuss soon) we can use this library for Attiny85. The VUSB library implemented HID class for generic keyboard. Every key on keyboard is assigned to a HID key code. To press a key virtually we need send corresponding HID key code.
Now I have mapped the IR key codes with HID key codes. On remote button press the Attiny85 receives the IR message and decode it and then sends mapped HID key code to computer. For example when I need to pause video on KMPlayer I just send pause HID key code of ‘SpaceBar’(0x2C). The computer will never know that the key code is coming from custom device instead of a real keyboard and video become paused.

Get IR Key Code: Before we program the Attiny85 we need to know what protocol is being used by the remote and the IR key code of each remote key for mapping with HID key code. This can be done using a small piece of Arduino code. This code uses Ken Shirriff’s IR remote library to decode the IR protocols in this program.
Connect the TSOP as the below figure. Here I have used TSOP 98200 IR sensor. You can use any other TSOP (e.g. TSOP 1738), but the sensor pins must be connected as mentioned. Wrong connection may damage TSOP sensor, Arduino Board or both.
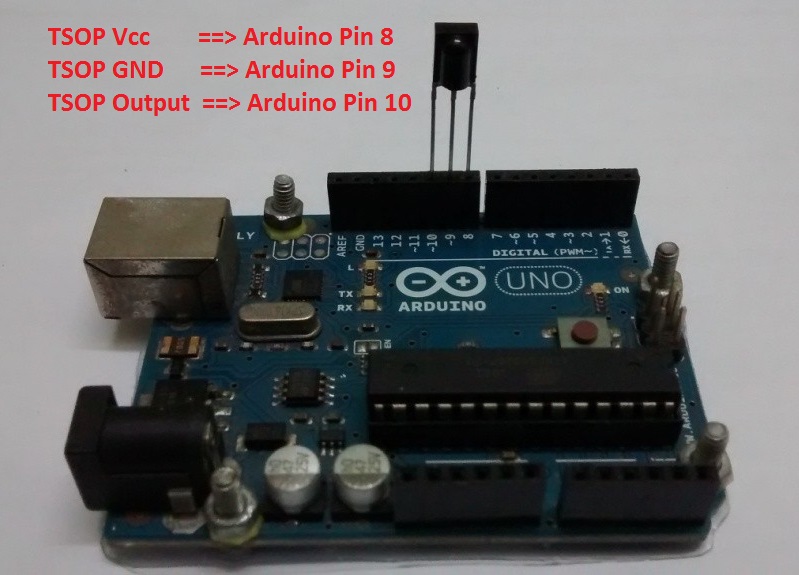
After connecting TSOP, upload IRCodeFinder sketch to Arduino UNO. Open Arduino serial monitor with baud rate 9600. Now press any key on remote. You will get the remote protocol and key code. Remember that it contains both address and command. For RC5 and RC6 the command is last 2 characters and for NEC command is last 4 characters.
For example RC5-80C or RC5-0C represents that the protocol is RC5 and IR key code is 0C. RC5 and RC6 address also contains flip bit. So here address is 00. Another example for NEC remote is NEC-40BD28D7. Here the command is 28D7 and address is 40BD. For repeat NEC sends NEC-FFFFFFFF.
Programming Attiny85: The easiest and cheapest way to program Attiny85 is to use Arduino environment. An Arduino Uno board can be used as programmer. High Low Tech is a very good tutorial to program Attiny with Arduino. This tutorial uses internal 8MHz RC oscillator as clock. But here we are using 16MHz external crystal (to work with USB properly). So we need the following modification.
- 16MHz crystal need to be attached with Attiny85 (between pin 3 and 4) while programming.
- Attiny85 bootloader for 16MHz external crystal oscillator should be used. This bootloader must be uploaded to set the fuse before uploading the program. Download the bootloader and unzip the files. It should contain a folder named ‘tiny’. Now create subfolder ‘hardware’ inside the sketchbook folder. Copy the ‘tiny’ folder inside ‘hardware’ folder. Navigate to ‘avr’ folder inside ‘tiny’ and rename ‘Prospective Boards.txt’ to ‘boards.txt’. After restarting Arduino IDE the ‘Attiny85 @ 16MHz (external crystal; 4.3 V BOD)’ option will be available at Tools → Board.
Additionally you can follow the instructions under ‘Installing ATtiny support in older versions of Arduino’ in High Low Tech for more details.
VUSB library tweak for Attiny85: Download and extract UsbKeyboard library (vusb-for-arduino-005\libraries\UsbKeyboard) from vusb-for-arduino library. Copy ‘UsbKeyboard’ folder to ‘library’ folder inside Arduino installation location. The library is created for Arduino and targeted pins from Port D. But Attiny85 does not have this Port pins. In order to work with Attiny85, we need do following library changes.
1. UsbKeyboard/usbconfig.h file modification:
Under ‘Hardware Config’ find and replace following lines
#define USB_CFG_IOPORTNAME D → #define USB_CFG_IOPORTNAME B
#define USB_CFG_DMINUS_BIT 4 → #define USB_CFG_DMINUS_BIT 0
Under ‘Optional Hardware Config’ find and replace following line
#define USB_CFG_PULLUP_IOPORTNAME D → #define USB_CFG_PULLUP_IOPORTNAME B
2. UsbKeyboard/UsbKeyboard.h file modification :
Under UsbKeyboardDevice () function find and replace following lines
PORTD = 0; // TODO: Only for USB pins? → PORTB = 0; // TODO: Only for USB pins?
DDRD |= ~USBMASK; → DDRB |= ~USBMASK;
Source code: To get all source code click here.