Now a day we use computer not only for office work but also as primary entertainment system. Some time we feel the absence of a remote controller for almost every Desktop or Laptop. For instance a remote controller can be very helpful during presentation at office to change the slides. Another good example would be controlling volume or rewinding while watching movie on desktop. There are few pc-remote controllers available in the market, but functionality of these remotes are predefined and sometime it fails to fulfil our requirement.
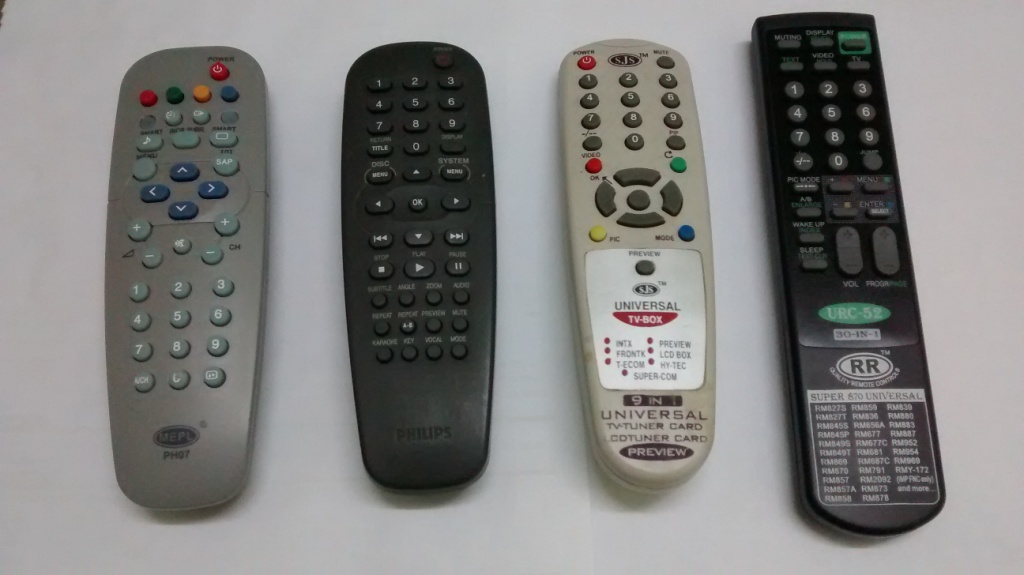
General purpose cheap IR remote controllers (e.g. TV, DVD remote) are widely available in the market. We will use these remote controllers as they are very reliable and there is no point of making customize one. In this tutorial I will show how we can build an extremely versatile and easily configurable PC remote receiver. For decoding IR message we need a microcontroller. I chose Arduino and 8051 for this. The circuit is different for these environments. The program logic is not only dependent on the environment but also it varies for different IR protocols. Despite of these factors the basic concept remains same.

Source Code: To get all the source code and standalone applications click here.
IR Protocols: An IR remote controller communicates with its receiver application by sending digital data modulated with Infra-Red ray which is invisible to human eyes. The remote transmits an unique message upon each button press. As there are number of other IR sources in our environment this message needs to be properly encoded to avoid distortion or data loss. The encoding varies depending on the remote manufacturers. But almost all of them follow certain standard, known as IR protocols. In my project I picked-up the most widely used protocols e.g. RC5, RC6 and NEC (The list is not limited to Arduino based design).
To know more about these protocols please read my IR protocol tutorials.
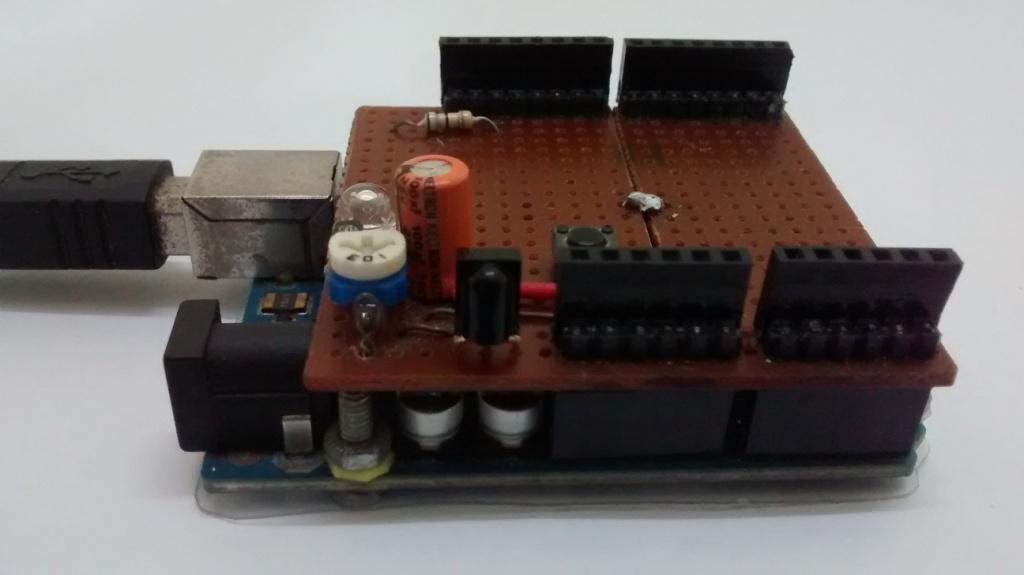
My Prototype Gallery:
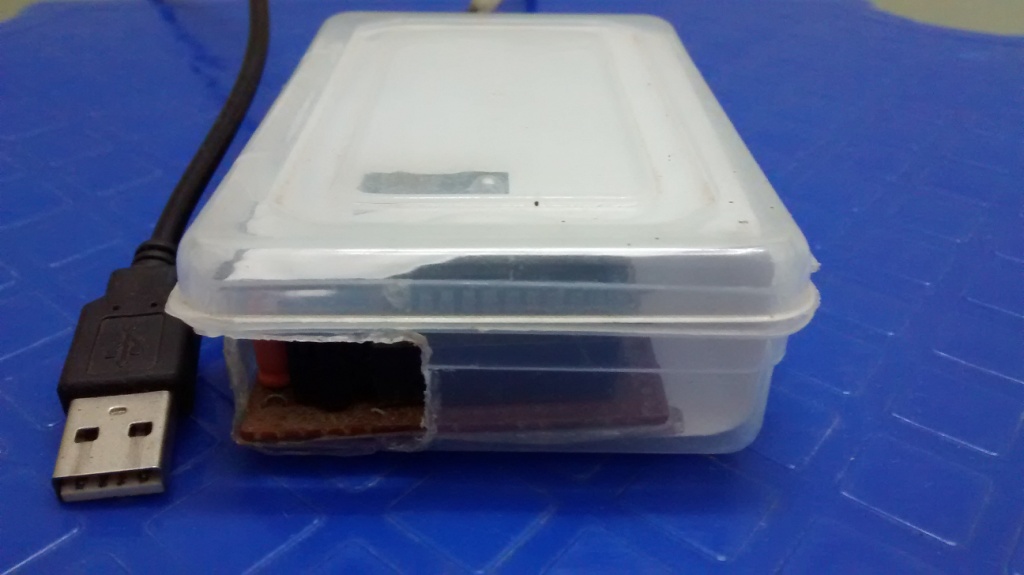 8051 Based IR Receiver
IR Receiver: The digital message is modulated with 36, 38 or 40 kHz IR base frequency. This signal can be easily demodulated using TSOP and it provides raw message as output. This raw message can’t be directly feed to USB as protocols are completely different. For this reason I have introduced microcontroller as middleware. But both Arduino (Uno version) and 8051 can only communicate to computer through UART serial port. Now one option could be sending the message to computer by just echoing the TSOP output value to UART port in binary format. But again the UART speed is not high enough to send the IR message pattern in real time. To overcome this I decoded the raw message inside microcontroller itself and converted it to meaningful communication string. Then I sent this string to computer over UART for further processing. In both approach I used same pattern for communication string and UART baud rate is 19200. This makes desktop app and receiver loosely coupled. It means you do not have to change desk application irrespective of Arduino or 8051 based decoder.
The power supply for receiver is provided by USB. I attached one white LED with the receiver which is used to indicate the status (e.g. connected) or debugging purpose. Sometime I use this LED as a small illuminator while watching movie in dark room.
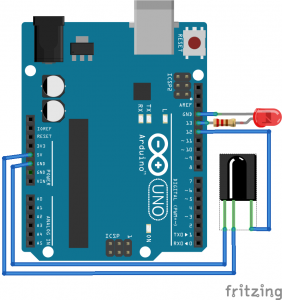
1. Arduino based IR decoding: Decoding IR message using Arduino is pretty straight forward. Connect the output of TSOP to any I/O pin. Then decode IR messages using Ken Shirriff’s IR library. This is one of the awesome library for dealing with IR. In my desktop application I handled RC5, RC6, NEC and SONY protocol as the library was supporting only this protocols when I created the project. Currently the library is extended to handle Panasonic, Samsung, Sharp and many more remotes. You can use these remotes with minimal code change.
Required Components:
- Arduino Uno
- USB A-B Cable
- TSOP 1738
- Jumper Wires
- 222Ω resistance
- White LED
Here is the circuit diagram for Arduino based IR receiver.
2. 8051 based IR decoding: I like 8051 microcontroller because of its simplicity and cheap price. Though I agree that it is not as much flexible as Arduino. I could not find any IR library like Arduino for 8051. Hence I wrote the IR decode program for most commonly used remotes (RC5, RC6 and NEC). Compared to the Arduino library this is not a single piece of code. We must know which protocol remote we are going to use and corresponding program need to load to the microcontroller. The code is written in c language and compiled by SDCC. Note that different compiler generates different hex code. In case you are using different compiler you may need to adjust the time delay as IR protocol decoding is heavily dependent with time frame.
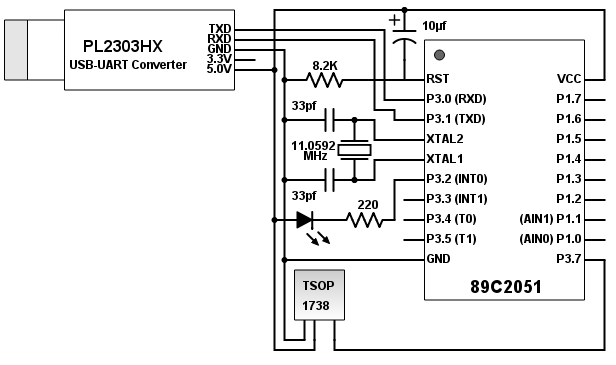
For this project I used 89C2051 which is 8051 based microcontroller. The crystal I have used is 11.0592MHz as it gives error free UART communication.
Required Components:
- 89C2051 Microcontroller
- 20 pin IC socket
- 11.0592Mhz crystal
- 10μF capacitor (2 pieces)
- 33pF capacitor (2 pieces)
- 8.2kΩ resistance
- 222Ω resistance
- White LED
- TSOP 1738
- PL2303 USB to UART Converter
- Veroboard
- Wire and Tools
Here is the circuit diagram for 8051 based receiver.
UART to USB Conversion: Now remember for Arduino based design the board itself contains UART-USB serial converter. We can connect the Arduino board directly to computer through USB. The Arduino creates virtual serial port on the desktop side and our IR receiver will communicate with desktop application through this port.
In contrast for 8051 based design we need a UART-USB serial converter and I used PL2303HX for my prototype. This will create a virtual serial just like Arduino. The driver of PL2303HX must be installed in the computer. From internet I came to know PL2303HX driver does not work Windows 8 and 10 OS. So if you are using one of these OS, go ahead with any other converter. It should not cause any issue.
Some older computer have serial port (DE-9).In that case we can connect 8051 to computer through MAX232 level shifter and you can avoid USB-UART serial converter and IR driver.
Desktop Application (Based on Processing): I wrote the application in JAVA to make it platform-independent and only JRE(JAVA Runtime Environment) needs to be installed to run this program. The downside of core JAVA is currently their focus moved from standalone desktop application. For example the serial communication using JAVA is not natively supported anymore. Creating GUI (Graphical interface) using core java is also painful. For this reason I chose Processing Platform for building desktop application. Processing is built on top of JAVA and it helps to export our program as standalone cross platform application (Windows, Linux and Mac OS).
The processing is still in development phase and it gets update frequently. So the program might not be compilable if you are using different version that I used (Version 2.0.3). However if you just want to use the application without any code modification then unzip the ‘RemoteApplication.zip’ from the source code and run the standalone application. It should work fine without processing environment (because finally it is a JAVA application). Though code alteration is not possible for extracted standalone application but still you will be able to configure the settings like static serial port, key mapping etc. through configuration xml in data folder.
How to operate: While making this project my first priority was ease of use. The operating procedure is same irrespective of IR receiver type.
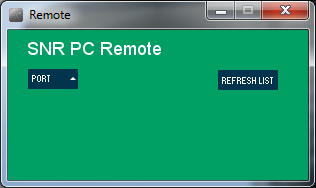
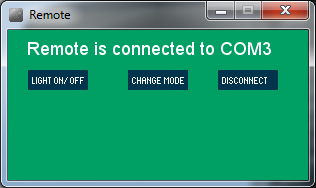
1. Connect IR receiver to application: First connect the IR receiver device to computer through USB. Now the Arduino of Profilic (PL2303HX) serial port will be available to the computer. Find the serial port number from control panel (for windows OS go to Control Panel → Device Manager → Ports). Next run the exported application. Select the connected serial port from ‘PORT’ dropdown. The connection success message will be shown and the LED on IR receiver will blink twice. If the connected port is not listed in the dropdown then click on ‘REFRESH LIST’ to reload the available ports.
2. Control your computer in different modes: After connection established press any button on remote and the assigned task will be performed.
The LED on the IR receiver can be turned on or off from both the remote and desktop application. You also can use this to verify connection status at any time.
The 0-9 button on the remote can be configured in two modes. The default mode is ‘Shortcut Mode’. In this mode you can open any pre-configured folder by pressing the number buttons. Another mode is ‘Number Mode’. Using this mode you can perform tasks like other buttons as per configuration (this includes pressing 0-9 numpad key). These two modes can be switched from both remote and desktop application.
The serial connection can be closed by clicking on ‘DISCONNECT’ from the application.
3. Customize settings using configuration.xml: The configuration.xml can be found at application/data folder. This file gives the user flexibility (without code change and compiling) to customize the application like static serial port, shortcut mode file locations and remote button-task mapping. When the application starts the user settings loaded from the xml.
To edit the configuration open this file in any text editor (e.g. Notepad). Then modify your changes and save it. Now restart the application to apply the changes. Remember any misconfiguration can crash the application. Follow the proper hierarchy.
The serial port can be pre-configured from the xml. Computers generally remember the serial port name when a device get connected for first time and assign it to the same port in future. Suppose your computer connects IR receiver on ‘COM3’, then it can be configured in the following way.
<serialPort>COM3</serialPort>
This will reduce the effort of making connection every time. The IR receiver must be connected before starting the application if the port is pre-configured.
10 folder locations can be configured for shortcut mode. If you want to open ‘Music’ folder of E drive on key press ‘1’ then the configuration will look like this.
<shortcut id=”0″>E:/Music</shortcut>
The most useful configuration is key-mapping. The JAVA code virtually presses computer keyboard key to perform a predefined task. For example to open windows menu programmatically, JAVA robot class just press Ctrl+Esc. The list of all pre-defined tasks can be found in configuration.xml under type=’MAP’. If you have proper Processing environment to compile the application you can extent the list without any limitation.
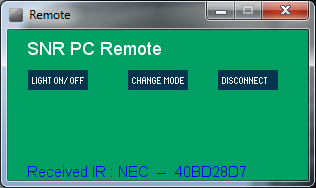
Apart from the task name you also need remote protocol and IR message of the corresponding remote button when you want to configure any key. To make it easy I printed this information at the bottom of the application. Suppose you want to configure ‘Power’ button of your remote with ‘Windows’ key of the computer. Connect the IR receiver and run the application. Then press the remote ‘Power’ button. The application will print ‘Received IR : NEC — 40BD28D7’ at the bottom where ‘NEC’ is your remote protocol and ‘40BD28D7’ is IR message. Now use the following line in your configuration.xml file
<remoteKey type=”NEC” id=”40BD28D7″ key=”POWER”>WINDOWS</remoteKey>
I have tested the application on Windows for RC5, RC6, NEC and SONY remote. For testing I also created a Remote Emulator which can be used as virtual remote using Null-Modem Emulator (e.g. com0com).Click here to download all source code. Please feel free to contact me if you have any query.