While making Arduino, 8051 microcontroller or any other digital electronics project we often need human interaction and we use keyboard or keypad. Making custom keypad for individual prototype project is time consuming and painful process. It also takes large number of microcontroller pin for interfacing. In this tutorial I am going to show how we can create compact, reusable, easy to use, wired or wireless general purpose keypad. This keypad is configurable up to 16 keys using only 4 pins (we can use an additional pin as interrupt or trigger).
Technology used: The idea is based on DTMF Technology. To make the keypad wireless we have multiple options.
1. Using 433MHz RF transmitter-receiver. Data sent digitally using this module. Other digital wireless module also will work fine with proper encoder and decoder.
2. Using Bluetooth audio receiver. You can also use any other wireless audio technology like FM transmitter and receiver. I found bluetooth as more convenient because of its wide availability.
3. Using two Mobile phones. One mobile act as DTMF generator-transmitter and another as receiver. In this way we can use mobile a remote of our application which can be operated from anywhere of the world.
What is DTMF: DTMF or Dual Tone Multi Frequency is a signaling system for identifying keys which was designed to recognize number press over telephonic system. A set of 8 voice frequencies are used to represent 16 different keys. For every key press two specific frequencies are transmitted over telephone line.
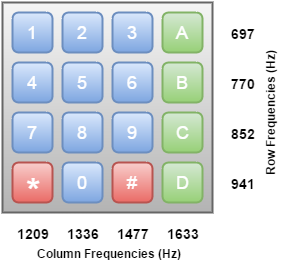
The DTMF keypad is laid out in 4×4 matrix buttons in which each row represents low frequency component and each column represents high frequency component. When user presses any key, the DTMF system generates combination of its row and column frequency. For example when user press key 0 the system produces a tone of 941 and 1336 Hz.

How to generate DTMF tone: There are multiple ways to produce DTMF tone. You can use choose any one of these.
1. The easiest way is to use Mobile Phone. All mobile phones use DTMF tone for dialing numbers. Use 3.5mm headphone jack to take generated sound as input to DTMF decoder. If you are using smartphone and you do not want to use dial pad, there are number of apps in the market which can produce DTMF tone.
2. If you want generate from your PC there are multiple free software for it. Connect the input of DTMF decoder to PC sound output port. Some software gives keyboard accessibility and you can use numpad on keyboard.
3. If you want DTMF generator for your project permanently you can make by yourself easily. There are number of DTMF generator ICs e.g. UM91214B, HT9200A, HT9200B. This ICs need very few number of external component to get work.
DTMF Decoder Module: To identify the key use it in our project we need to decode the DTMF tone and convert it to digital form. At telephonic system this tones are decoded by digital signal processing. Fortunately there are number of ICs available in market which can decode this tone and gives digital data as output. In this project I used CM8870 as DTMF decoder.
The digital data is in 4 bit format and it is latched by the decoder IC. If you want to identify any key press by hardware interrupt use STD pin of the decoder.
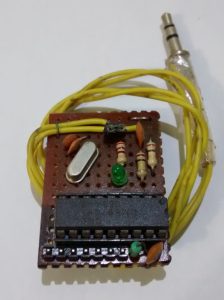
Here is my DTMF Decoder Module prototype.

Required components for DTMF Decoder Module:
- CM8870
- 3.579545 MHz Crystal
- 0.1 μF Capacitor (2 piece)
- 100 kΩ resistance (2 piece)
- 300 kΩ resistance
- 7 pin Male Header
- 3.5mm audio jack
- Veroboard
- Tools and wire
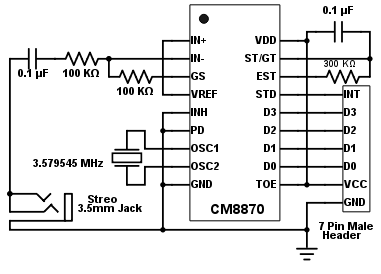
Circuit design for DTMF Decoder Module: While designing the decoder module circuit I kept two things in my mind. First it should be compact as much as possible. Second it should be reusable for different projects. I have used a 7 pin male connector to integrate with our main project (e.g Arduino or other Microcontroller project). This makes it breadboard friendly. The last two pins on the connector are VCC and GND. These pins will supply required power for the module directly from the main project. The audio signal will be provided by 3.5mm stereo audio jack. Here is the circuit diagram.

Different ways of integration to project: There are several ways to integrate DTMF decoder module with our projects and I am going to describe few of them. To keep the description simple I will take Mobile as DTMF tone generator. But you can use other devices like Computer or Custom DTMF generator where it is applicable.
Increase your phone’s keypad volume to maximum. You might need an audio amplifier if the generated audio amplitude is not high enough.
1. Wired connection: This is simplest configuration. Connect audio pin of decoder module to the headphone jack of mobile and use the dialer or DTMF generator app. This will reduce effort of the projects where we need a keypad and we can keep our focus to the other functionalities.
![]() 2. Wireless connection using 433MHz RF module: 433MHz transmitter-receiver is a very popular digital wireless module among the electronics hobbyists. We need to encode our message properly before feeding data to 433Hz transmitter data pin and conversely we need to decode the message received from receiver data pin. HT12E and HT12D servs this two purpose quite efficiently. These are 4 bit encoder and decoder. So while integrating you need not to change any configuration from wired connection. Only the interrupt logic is inverted.
2. Wireless connection using 433MHz RF module: 433MHz transmitter-receiver is a very popular digital wireless module among the electronics hobbyists. We need to encode our message properly before feeding data to 433Hz transmitter data pin and conversely we need to decode the message received from receiver data pin. HT12E and HT12D servs this two purpose quite efficiently. These are 4 bit encoder and decoder. So while integrating you need not to change any configuration from wired connection. Only the interrupt logic is inverted.
 3. Wireless connection using bluetooth audio : This is another easy and efficient way to make the keyboard wireless. You need a bluetooth audio receiver module for this. There are few cheap modules available which can be powered from USB. Connect audio pin of decoder module to the audio output jack of bluetooth receiver. Now pair the receiver with your bluetooth enabled mobile. Use the dialer or DTMF app to generate the tone.
![]()
4. Remote connection using two mobile phones: This configuration is really helpful if you want to go distance. A phone with auto answer facility is required for this. Connect audio pin of decoder module to the headphone jack of this phone keeping auto answer enabled. Now call from another mobile and dial the number to generate the tone.
![]()
Keypad Demo:
I interfaced MT8870 DTMF decoder interfacing with arduino uno using mobile its working but i need to operate this module using sim800l and DTMF with auto call receiving low to write the receiving code can any body provide this.
Hi Satya,
All the best for your project. If you face any particular issue I am happy to help you. But unfortunately I do not have enough time to right entire project for you.
Hi I am trying to control the automatic water tank motor ON and OFF and kitchen application for detecting Gas leakages using arduino-mega and DTMF module I tried code it was working only on motor I don’t understand why the gas leakage was not detecting can any provide the code for DTMF module ??
Hi Sravya,
Please provide me some more information about the project architecture so that I can help you.
I interfaced dtmf module to Arduino Uno for mobile control switching using DTMF Module I given only four key operation but I pressed 8th key in I don’t know why the key is operating Please give any code thank you.
Hi Surya,
I could not understand your use-case. Can you please provide some more information.